
SP Metadata for Amazon Cognito
Cognito is the easy-to-implement authentication service for web and mobile apps hosted in the AWS ecosystem.
Cognito provides “user pools” — or groups of user’s coming from various sources — against which an application can authenticate a user, with those further able to be extended to external sources such as social media (Google, Facebook, Amazon) or federated identity providers via SAML 2.0.
And when it comes to implementing SAML 2.0 integration with an identity provider (IDP), Amazon provides pretty good documentation.
However that documentation, and indeed the Cognito service, lacks something relatively fundamental.
Cognito admirably accounts for the fact that most Service Provider operators will recieve from their integration partners an XML metadata bundle representing the IDP, and hence provides the ability to configure the SAML connection on the Cognito side by uploading that IDP metadata document. They even allow you to supply a link to the IDP metadata, given that many IDP operators maintain URLs which serve up a signed copy of the latest metadata, in an effort to provide simpler rollover of SAML signing and encryption certificates.
However, where Cognito fails utterly (as of the writing of this document) is to provide a simple means to generate service provider (SP) metadata, leading to awkward conversations where unknowing Cognito admins are being asked by more knowledgeable IDP operators for metadata that they don’t have. Furthermore, Cognito’s documentation is really lacking in the area of how to create that metadata.
As such, this post is intended as a quick how-to for Cognito SP operators to generate valid XML metadata representing the Cognito SP.
Metadata Prerequisites
There are three core pieces of information that you are required to know in order to generate SAML SP metadata for a Cognito User Pool:
The Cognito User Pool ID: $pool_id
You can access this information from the AWS Console. From the upper left hand corner select “Services -> Security, Identity, and Governance -> Cognito” to access the Cognito control panel. Then select “Manage User Pools”. You should then select the User Pool for which you wish to obtain the Pool ID. Selecting a User Pool will take you to the “General Settings” for the Pool, which should list the “Pool ID” at the top:
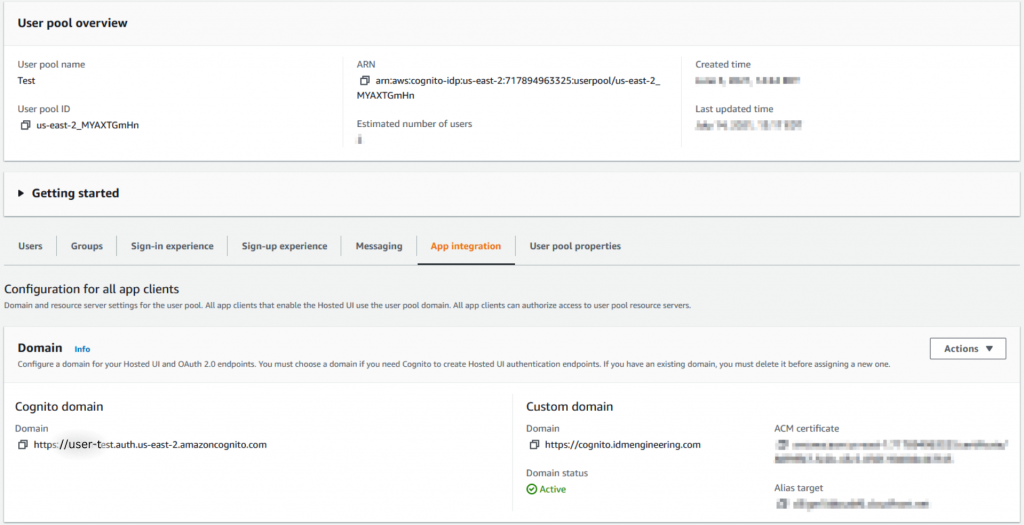
At the time of writing this post Cognito is moving to a “new” interface. You can access the Pool ID in basically the same way, however Amazon conveniently lists the Pool ID on your list of User Pools:
The User Pool’s AWS Region: $region
Conveniently, you can get this straight out of the Pool ID:
as the struction of the $pool_id is $region_XXXXXXXXX. As you can see from the above example, my test User Pool is located in the “US East 2 (Ohio)” region, hence $region = us-east-2 for our metadata.
Cognito Domain Prefix: $domain_prefix (or Custom Domain)
Lastly, you will specify a domain prefix when you create the User Pool, which establishes a domain that uniquely identifies the pool to AWS. This will take the form of:
$domain_prefix.auth.$region.amazoncognito.com
Alternatively, if you have associated a custom domain to your Cognito User Pool, you will substitute that.
You’ll find the settings for the domains under “App Integration -> Domain Name” in the current Cognito User Pool Settings,
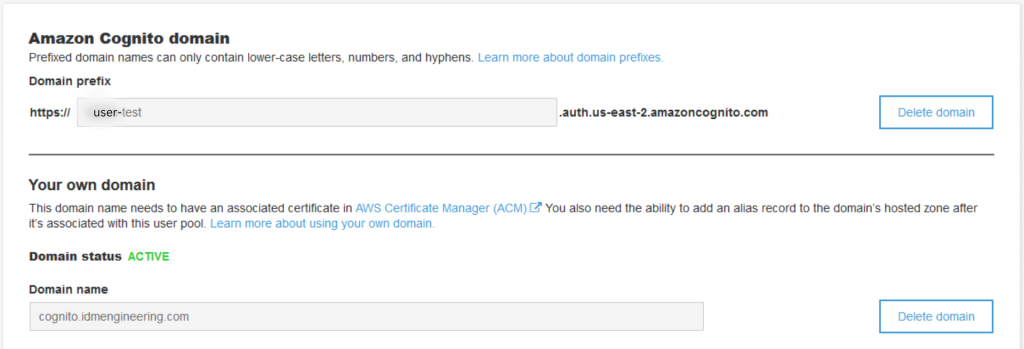
or on the “App Integration” tab in the new Cognito interface:
Integration Particulars
Additionally, you’ll want to make some decisions now about things like the SAML attributes that you require from the IDP. Each of these will be enumated within the templated metadata below, and you’ll want to know the name of the attribute, as well as it’s friendlyName.
There are many particularities to Cognito attribute mappings, and fortunately, the documentation about attribute mapping is quite robust.
The keys are the following:
- Cognito requires an attribute as the SAML
<NameID>which will be used to uniquely identify the user within Cognito. You don’t necessarily need to use this as the principal identifier within your application, but it is ideally a useful identifier for a human being to look at (i.e. not a transient:urn:oasis:names:tc:SAML:2.0:nameid-format:transient). We recommend requesting some form of “user id” as a persistent identifier (urn:oasis:names:tc:SAML:2.0:nameid-format:persistent). - Ensure that any attribute mappings that you define in Cognito are properly enumerated within the metadata, as this will assist the IDP deployer in facilitating their configuration of attribute release.
We furthermore strongly encourage the following best practices:
- Don’t ask for an email address as the NameID / principal identifiers. Email addresses frequently change!
- Request only the minimal set of attributes your application requires.
- Be flexible! It is generally considered rude within the SAML community for a vendor to demand that an IDP releases a custom attribute specific to your organization. Instead, adapt your attribute mapping to work with what the IDP has available to send. Generic names are also good:
mail,uid,sn,givenNameetc.- Really any of the common LDAP attributes with their associated OIDs are likely to be well-supported by most identity providers.
- Many IDPs also can easily facilitate common ADFS attributes.
Building the SP Metadata
Now we can construct our metadata… we will use the following elements:
$pool_id$region$domain_prefix- The
NameIDformat we’ll request, in this example case:urn:oasis:names:tc:SAML:2.0:nameid-format:persistent - A list of attributes we’ll need, in this case we are requesting
mail,givenName, andsnusing standard LDAP OIDs.
You will then use the following template to substitute your values for $pool_id, $region, and $domain_prefix.
<?xml version="1.0"?>
<md:EntityDescriptor xmlns:md="urn:oasis:names:tc:SAML:2.0:metadata" entityID="urn:amazon:cognito:sp:$pool_id">
    <md:SPSSODescriptor AuthnRequestsSigned="false" protocolSupportEnumeration="urn:oasis:names:tc:SAML:2.0:protocol">
        <md:NameIDFormat>urn:oasis:names:tc:SAML:2.0:nameid-format:persistent</md:NameIDFormat>
        <md:AssertionConsumerService
Binding="urn:oasis:names:tc:SAML:2.0:bindings:HTTP-POST"
Location="https://$domain_prefix.auth.$region.amazoncognito.com/saml2/idpresponse"
index="1"/>
        <md:AttributeConsumingService index="1">
            <md:ServiceName xml:lang="en">Cognito Sample SP</md:ServiceName>
            <md:RequestedAttribute FriendlyName="givenName" Name="urn:oid:2.5.4.42"/>
            <md:RequestedAttribute FriendlyName="sn" Name="urn:oid:2.5.4.4"/>
            <md:RequestedAttribute FriendlyName="mail" Name="urn:oid:0.9.2342.19200300.100.1.3"/>
        </md:AttributeConsumingService>
    </md:SPSSODescriptor>
</md:EntityDescriptor>
And substitute your NameID and attribute requirements as in the above examples. Note that the <md:ServiceName> element is not optional, and you should provide a relevant name for your purposes. Many IDP systems will tolerate the absence of this element, though formally to the spec for the <AttributeConsumingService> it is required
A Note About Signing
Note that we do not include a certificate within the metadata because Cognito does not support signed <AuthnRequests>. Hopefully Amazon will overcome this limitation in the future, as some IDP partners do require signing of these requests.
Need help with AWS Cognito? Contact us to discuss your needs. IDM Engineering is a team of dedicated, honest SSO support engineers that are standing by to help!