Category Archives: Blog

HOW TO: Using SAML-Tracer to Capture SAML Event(s) for Debugging Purposes

HOW TO: Using SAML-Tracer to Capture SAML Event(s) for Debugging Purposes


N.B. In our work, it’ll frequently become necessary to ask customers (or our client’s customers) to capture a SAML login or logout event, in order to assist our team in debugging the SAML workflow. This guide is therefore intended to serve as a walk-through for a potentially non-technical audience, to enable that user to install, use, and collect the log from the popular browser extension SAML-Tracer.

Step #1: Installing SAML-tracer


The SAML-Tracer add-on is available for free for Mozilla Firefox and Google Chrome from their respective web stores:

You can also leverage the Chrome version of the plugin in Chromium-based browsers, such as:

  • Microsoft Edge
  • Vivaldi
  • Brave

After you successfully install the extension, and to ensure that you have no active session, you should clear your browser’s cache and restart the browser.

PRO TIP: You can quickly access the menu for clearing your cache with the ctrl + shift + delete keyboard shortcut.

Step #2: Capturing a SAML Login or Logout


After installing the extension in your browser one simply needs to activate the extension in order for it to capture traffic. To do this, either look for the SAML-tracer icon in your browser:

Screenshot of browser toolbar with SAML-tracer icon visible and highlighted by red arrowing pointing at it.

Figure 1. Mozilla Firefox toolbar with SAML-Tracer icon.

In many browsers you’ll need to “pin” the icon to be visible by default, e.g. for Mozilla Firefox, you may find the SAML-Tracer icon hiding under the dropdown that appears when clicking on the two angle brackets to the right side of the image. Also, in a stock Google Chrome installation, for example:

Screenshot of Chrome browser toolbar with SAML-tracer icon visible within extensions dropdown.

Figure 2. Google Chrome toolbar with SAML-Tracer icon hidden in the “puzzle piece” menu.

You can see that the SAML-Tracer extension gets placed in the “Extensions” menu (denoted with a small puzzle piece). You can optionally pin the SAML-Tracer icon to the main toolbar with the “pin” button within that menu.

Once the extension is activated, you’ll see a small pop-up window like the following:

A screenshot of the initial window that opens when activating SAML-Tracer.

Figure 3. An empty SAML-Tracer window.

You’ll at this point potentially notice some lines appearing within the top-part of window. Ignore this for now. Go back to your browser, and log into the application you’re trying to capture debug information for.

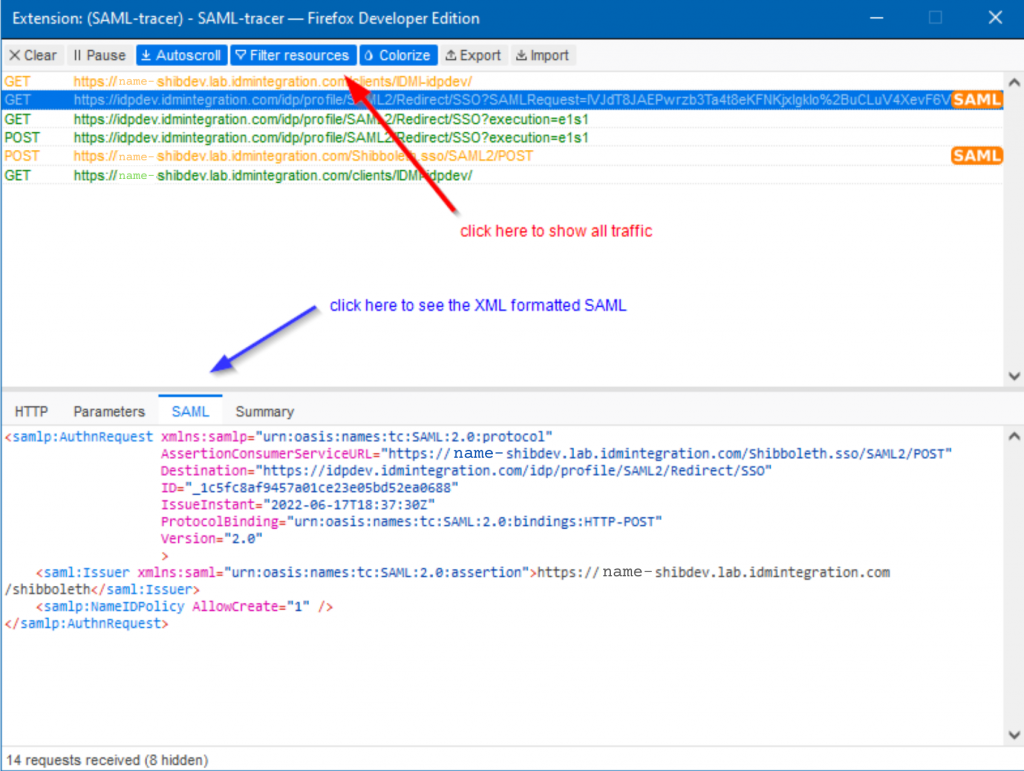
At this point, you’ll see many more lines appear as your are performing your login. These lines represent all of the various URLs that are being loaded or to which data is being sent. After you login, you should notice that some of the lines will have an orange saml logo to the right, for example:

Figure 4. A screenshot of the SAML-Tracer extension showing captured SAML.

If, when you click on one of the lines with this logo, and you also click on the “SAML” tab in the lower panel, you see some XML code as shown within the screenshot, then congratulations! You’ve captured SAML!

Step #3: Sharing the Captured SAML


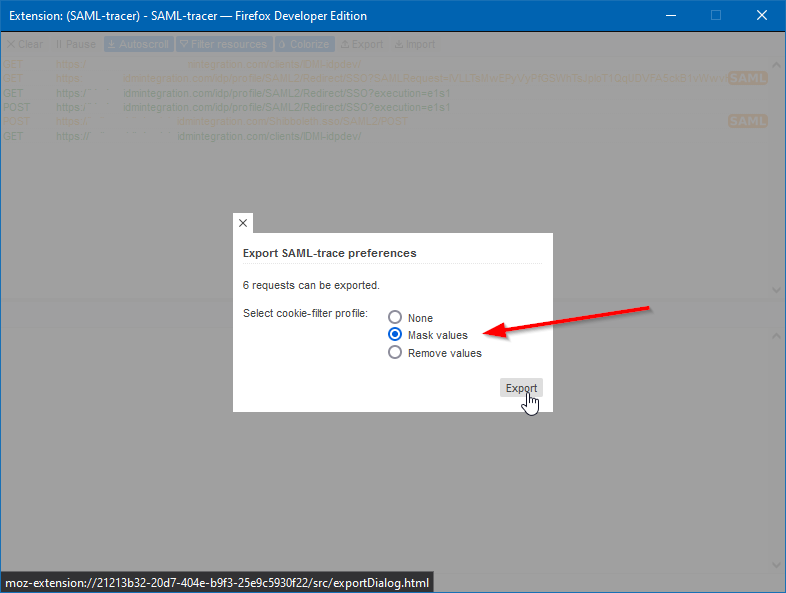
In order to share the capture you’ve just taken, click on the “export” button at the top of the SAML tracer window (next to “Colorize”). The window will darken, and a selection box will appear with some export options:

Figure 5. The SAML-Tracer export options screen.

WARNING: Make sure you either keep the “mask values” option checked, or select “Remove Values”. If you chose “None” in this dialog, you will capture any secret parameters that were exchanged in the process, namely plaintext passwords. You do NOT need to share a capture with a plaintext password. Removing, or masking the value with a series of ****** are the only advisable options here.

When you click “export”, a JSON file will be saved to the location of your choice. This is the file that you should share with the engineer that’s requesting the SAML trace.

If requested from the IDM Engineer, we’ll share with you a URL where you can securely upload the file, and it will be accessible only to the engineering team at IDME. Emailing this file is generally safe, though for added safety we recommend sharing the file through some means other than email.


Need help with a SAML issue? Contact us to discuss your needs. IDM Engineering is a team of dedicated, honest SSO support engineers that are standing by to help!

Shibboleth IDP File Permissions

The Future of Shibboleth SP

Shibboleth IDP File Permissions


In light of recent developments in the thread landscape involving JNDI, and Java library vulnerabilities such as Log4Shell (CVE-2021-44228), we note the critical importance of file permissions to the Shibboleth deployment.

Note: This document currently discusses only Linux-based deployments of Shibboleth IDP. We believe that the Windows installation handles permissions specific to that system automatically when performing an MSI-based installation procedure outlined by the wiki. We are investigating best practices for Windows installations and will update this document accordingly with our findings.

Linux Service Privileges


For a proper, secure installation of Shibboleth IDP, you should configure the servlet container (Jetty) to run as a non-root user. The proper configuration for this depends upon the servlet container of choice, i.e. for Eclipse Jetty (the recommended container):

Linux Filesystem Permissions


The most critical element of the file system permissions is to ensure that the user which runs the servlet container does not have write permissions for the IDP configuration files, except in select circumstances.

Below you’ll find a small shell script to set appropriate permissions for a “standard” deployment, meaning:

  • all files are by-default owned by root,
  • select permissions are provided to the user account under which the servlet container runs, i.e. jetty,
  • Shibboleth is installed in the default location: /opt/shibboleth-idp, and
  • the $JETT_BASE directory of the Jetty installation is /opt/jetty-base
#!/bin/sh
chown -R root:jetty /opt/shibboleth-idp/;
chown -R jetty:jetty /opt/shibboleth-idp/{credentials,logs,metadata};
find /opt/shibboleth-idp -type d -exec chmod 750 {} \;
find /opt/shibboleth-idp -type f -exec chmod 640 {} \;
chmod -R 750 /opt/shibboleth-idp/bin;
chmod -R u-w /opt/shibboleth-idp/credentials;
chown -R root:jetty /opt/jetty-base/;
chown -R jetty:jetty /opt/jetty-base/{logs,tmp};
find /opt/jetty-base -type d -exec chmod 750 {} \;
find /opt/jetty-base -type f -exec chmod 640 {} \;

Essentially, the jetty user requires read-access to most files within the IDP installation directory, hence we set root to own those files and jetty as the group, with permissions for the owner (root) to be allowed to edit those files, and the group (jetty) permission to read. Other users have no access.

jetty needs to own the credentials, logs, and metadata directories, with write permissions only for logs and metadata. If jetty doesn’t own credentials it’s unable to unlock the cryptographic keys required for SAML, and will not start. We remove the jetty users permissions to write to those files separately (chmod -R u-w /opt/shibboleth-idp/credentials).

Likewise, jetty needs to be able to write to the logs and tmp directories from $JETTY_BASE.

Essentially, the goal is to allow the jetty user to have the absolute minimal permissions to run the IDP software.

N.B. With this goal in mind, we note that if you do not leverage any <MetadataProvider> elements which fetch metadata from external locations, you shouldn’t even need to allow write access for the metadata directory. One option is to ensure that you specify a backingFilePath to a directory other than <IDP-HOME>/metadata, i.e. something like /var/cache/shibboleth. Then only that directory needs write access for jetty.


Need help assessing a security issue? Contact us to discuss your needs. IDM Engineering is a team of dedicated, honest SSO support engineers that are standing by to help!

Shibboleth Logging 101

Shibboleth Logging 101

Shibboleth Logging 101


If you’re installing, configuring, or managing a single sign-on environment, you will inevitably find yourself wanting (or needing) to understand what’s going on under the hood. That’s where log files come in. In this space, we’ve collected some useful general information about Shibboleth logging for both:


Shibboleth IdP Logging

Logging on Shibboleth IdP is implemented via an abstract layer (SLF4J) which directs control of logging to the Logback facility. Since the project depends upon these logging implementations, Shibboleth is somewhat beholden to configuring via these external methods. Thankfully, they are relatively generic and highly customizable.

Logging is configured in %{idp.home}/conf/logback.xml, where %{idp.home} is the location where Shibboleth IdP is installed (typically, and by default, /opt/shibboleth-idp). Importantly, you don’t usually need to adjust this file unless you want to make specific changes to the logging constructs, e.g. changing the format of the logged strings. Most of the major settings you’ll need to adjust can be edited from %{idp.home}/conf/idp.properties.

Logs are stored within %{idp.home}/logs.

Logging Options for idp.properties

VariableDefaultFunction
idp.loghistory180Number of days of logs to keep
idp.process.appenderIDP_PROCESSAppender to use for diagnostic log
idp.loglevel.idpINFOLog level for the IdP proper
idp.loglevel.ldapWARNLog level for LDAP events
idp.loglevel.messagesINFOSet to DEBUG for protocol message tracing
idp.loglevel.encryptionINFOSet to DEBUG to log cleartext versions of encrypted content
idp.loglevel.opensamlINFOLog level for OpenSAML library classes
idp.loglevel.propsINFOSet to DEBUG to log runtime properties during startup
idp.loglevel.springERRORLog level for Spring Framework (very chatty)
idp.loglevel.containerERRORLog level for Tomcat/Jetty (very chatty)
idp.loglevel.xmlsecINFOSet to DEBUG for low-level XML Signing/Encryption logging

“Debug” Logging

When we say “turn up logging to DEBUG” we really mean that you should adjust one or more of the above properties in order to see more useful information. There’s no fixed set, but in general:

  • If you’re doing any kind of debugging you should set idp.loglevel.idp = DEBUG
  • If you want to see the actual SAML assertions, you should use a combination such as:
idp.loglevel.idp = DEBUG
idp.loglevel.messages = DEBUG
idp.loglevel.opensaml = DEBUG
idp.loglevel.encryption = DEBUG
  • If you’re working on an issue with a data connector or attribute resolver, you might find:
idp.loglevel.idp = DEBUG
idp.loglevel.ldap = INFO
  • to be all that you really need, however, you can always take idp.loglevel.ldap to DEBUG as well (though be aware, it’s quite chatty).

WARNING: There is no reason to keep debug logging turned on in a production environment. This is especially true if you are capturing raw or decrypted SAML assertions. Don’t do it. Tune things back to default by commenting out your changes when you’re done! You have been warned.

More information about Shibboleth IdP Logging can be found on the wiki!


Shibboleth SP Logging

The Shibboleth SP software writes to two separate diagnostic log files by default, as configured by the shibd.logger and native.logger logging setup files. The first file governs most of the interesting “SAML” bits, like assertion receipt, decryption, and attribute resolution. These events will be logged into a file named shibd.log within the default log directory (unless modified):

  • Linux systems: /var/log/shibboleth
  • Windows systems: C:\opt\shibboleth-sp\var\log\shibboleth

native.logger controls messages related to RequestMapping, and more often than not isn’t needed. However, once caveat is that on Windows systems using IIS the default configuration leads to no creation of a simple native.log file. This can be easily addressed.

“Debug” Logging

Overall behavior is specified by the log4j.rootCategory parm in shibd.logger, which is by default:

log4j.rootCategory=INFO, shibd_log, warn_log

bumping this to DEBUG is minimally necessary for most debugging.

Debugging assertions

If you are interested in seeing the SAML assertions themselves, set:

log4j.category.OpenSAML.MessageDecoder=DEBUG
log4j.category.OpenSAML.MessageEncoder=DEBUG

by un-commenting these lines in shibd.loggger.

WARNING: There is no reason to keep debug logging turned on in a production environment. This is especially true if you are capturing raw or decrypted SAML assertions. Don’t do it. Tune things back to default by commenting out your changes when you’re done! You have been warned.

More information about Shibboleth SP Logging can be found on the wiki!


Need help debugging a Shibboleth issue? Contact us to discuss your needs. IDM Engineering is a team of dedicated, honest SSO support engineers that are standing by to help!

SP Metadata for Amazon Cognito

AWS Cognito SP Metadata

SP Metadata for Amazon Cognito


Cognito is the easy-to-implement authentication service for web and mobile apps hosted in the AWS ecosystem.

Cognito provides “user pools” — or groups of user’s coming from various sources — against which an application can authenticate a user, with those further able to be extended to external sources such as social media (Google, Facebook, Amazon) or federated identity providers via SAML 2.0.

And when it comes to implementing SAML 2.0 integration with an identity provider (IDP), Amazon provides pretty good documentation.

However that documentation, and indeed the Cognito service, lacks something relatively fundamental.

Cognito admirably accounts for the fact that most Service Provider operators will recieve from their integration partners an XML metadata bundle representing the IDP, and hence provides the ability to configure the SAML connection on the Cognito side by uploading that IDP metadata document. They even allow you to supply a link to the IDP metadata, given that many IDP operators maintain URLs which serve up a signed copy of the latest metadata, in an effort to provide simpler rollover of SAML signing and encryption certificates.

However, where Cognito fails utterly (as of the writing of this document) is to provide a simple means to generate service provider (SP) metadata, leading to awkward conversations where unknowing Cognito admins are being asked by more knowledgeable IDP operators for metadata that they don’t have. Furthermore, Cognito’s documentation is really lacking in the area of how to create that metadata.

As such, this post is intended as a quick how-to for Cognito SP operators to generate valid XML metadata representing the Cognito SP.

Metadata Prerequisites


There are three core pieces of information that you are required to know in order to generate SAML SP metadata for a Cognito User Pool:

The Cognito User Pool ID: $pool_id

You can access this information from the AWS Console. From the upper left hand corner select “Services -> Security, Identity, and Governance -> Cognito” to access the Cognito control panel. Then select “Manage User Pools”. You should then select the User Pool for which you wish to obtain the Pool ID. Selecting a User Pool will take you to the “General Settings” for the Pool, which should list the “Pool ID” at the top:

At the time of writing this post Cognito is moving to a “new” interface. You can access the Pool ID in basically the same way, however Amazon conveniently lists the Pool ID on your list of User Pools:

The User Pool’s AWS Region: $region

Conveniently, you can get this straight out of the Pool ID:

as the struction of the $pool_id is $region_XXXXXXXXX. As you can see from the above example, my test User Pool is located in the “US East 2 (Ohio)” region, hence $region = us-east-2 for our metadata.

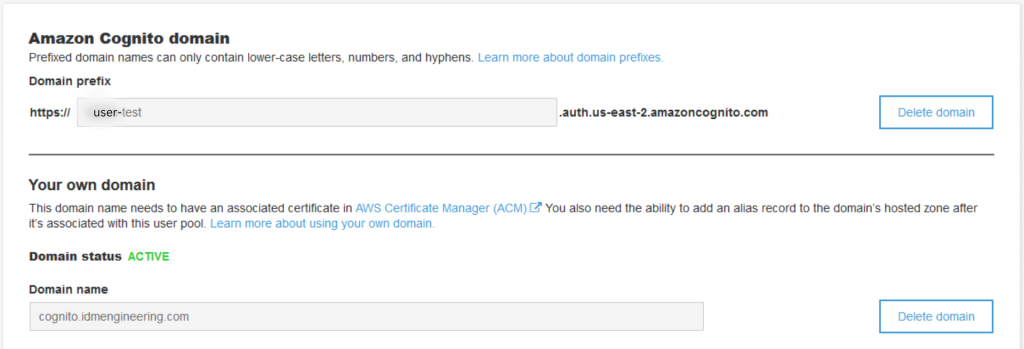
Cognito Domain Prefix: $domain_prefix (or Custom Domain)

Lastly, you will specify a domain prefix when you create the User Pool, which establishes a domain that uniquely identifies the pool to AWS. This will take the form of:

$domain_prefix.auth.$region.amazoncognito.com

Alternatively, if you have associated a custom domain to your Cognito User Pool, you will substitute that.

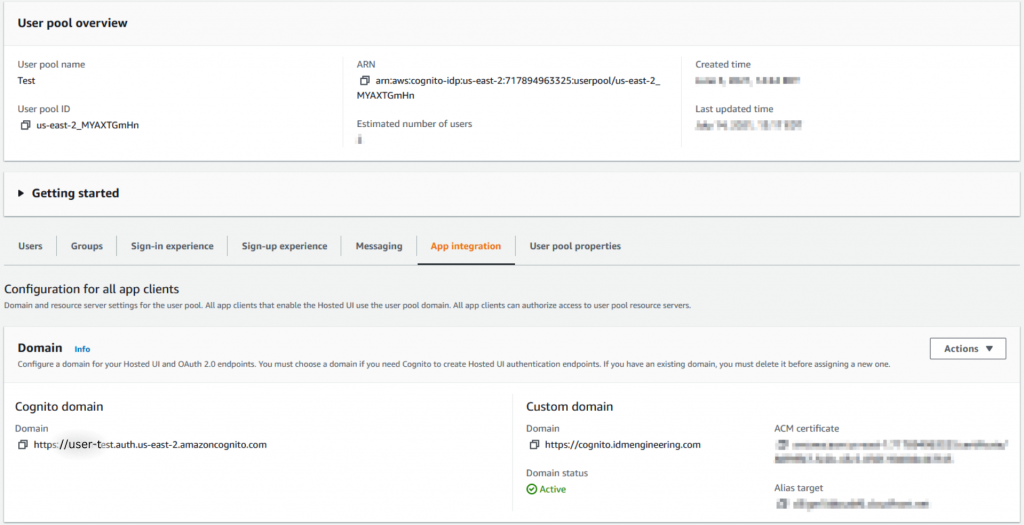
You’ll find the settings for the domains under “App Integration -> Domain Name” in the current Cognito User Pool Settings,

or on the “App Integration” tab in the new Cognito interface:

Integration Particulars


Additionally, you’ll want to make some decisions now about things like the SAML attributes that you require from the IDP. Each of these will be enumated within the templated metadata below, and you’ll want to know the name of the attribute, as well as it’s friendlyName.

There are many particularities to Cognito attribute mappings, and fortunately, the documentation about attribute mapping is quite robust.

The keys are the following:

  • Cognito requires an attribute as the SAML <NameID> which will be used to uniquely identify the user within Cognito. You don’t necessarily need to use this as the principal identifier within your application, but it is ideally a useful identifier for a human being to look at (i.e. not a transient: urn:oasis:names:tc:SAML:2.0:nameid-format:transient). We recommend requesting some form of “user id” as a persistent identifier (urn:oasis:names:tc:SAML:2.0:nameid-format:persistent).
  • Ensure that any attribute mappings that you define in Cognito are properly enumerated within the metadata, as this will assist the IDP deployer in facilitating their configuration of attribute release.

We furthermore strongly encourage the following best practices:

  • Don’t ask for an email address as the NameID / principal identifiers. Email addresses frequently change!
  • Request only the minimal set of attributes your application requires.
  • Be flexible! It is generally considered rude within the SAML community for a vendor to demand that an IDP releases a custom attribute specific to your organization. Instead, adapt your attribute mapping to work with what the IDP has available to send. Generic names are also good: mail, uid, sn, givenName etc.

Building the SP Metadata


Now we can construct our metadata… we will use the following elements:

  • $pool_id
  • $region
  • $domain_prefix
  • The NameID format we’ll request, in this example case: urn:oasis:names:tc:SAML:2.0:nameid-format:persistent
  • A list of attributes we’ll need, in this case we are requesting mail, givenName, and sn using standard LDAP OIDs.

You will then use the following template to substitute your values for $pool_id, $region, and $domain_prefix.

<?xml version="1.0"?>
<md:EntityDescriptor xmlns:md="urn:oasis:names:tc:SAML:2.0:metadata" entityID="urn:amazon:cognito:sp:$pool_id">
    <md:SPSSODescriptor AuthnRequestsSigned="false" protocolSupportEnumeration="urn:oasis:names:tc:SAML:2.0:protocol">
        <md:NameIDFormat>urn:oasis:names:tc:SAML:2.0:nameid-format:persistent</md:NameIDFormat>
        <md:AssertionConsumerService
Binding="urn:oasis:names:tc:SAML:2.0:bindings:HTTP-POST"
Location="https://$domain_prefix.auth.$region.amazoncognito.com/saml2/idpresponse"
index="1"/>
        <md:AttributeConsumingService index="1">
            <md:ServiceName xml:lang="en">Cognito Sample SP</md:ServiceName>
            <md:RequestedAttribute FriendlyName="givenName" Name="urn:oid:2.5.4.42"/>
            <md:RequestedAttribute FriendlyName="sn" Name="urn:oid:2.5.4.4"/>
            <md:RequestedAttribute FriendlyName="mail" Name="urn:oid:0.9.2342.19200300.100.1.3"/>
        </md:AttributeConsumingService>
    </md:SPSSODescriptor>
</md:EntityDescriptor>

And substitute your NameID and attribute requirements as in the above examples. Note that the <md:ServiceName> element is not optional, and you should provide a relevant name for your purposes. Many IDP systems will tolerate the absence of this element, though formally to the spec for the <AttributeConsumingService> it is required

A Note About Signing


Note that we do not include a certificate within the metadata because Cognito does not support signed <AuthnRequests>. Hopefully Amazon will overcome this limitation in the future, as some IDP partners do require signing of these requests.


Need help with AWS Cognito? Contact us to discuss your needs. IDM Engineering is a team of dedicated, honest SSO support engineers that are standing by to help!

Log4j Remote Code Execution Vulnerability

The Future of Shibboleth SP

Log4j Remote Code Execution Vulnerability


CVE-2021-44228 is a vulnerability identified with the Apache Log4j package that is classified under the highest severity (10 out of 10). This vulnerability allows an attacker to execute arbitrary code by injecting data into a logged message.

This post is an attempt to provide an analysis of the vulnerability and a discussion of potentially affected Identity Management products.

For details from the Apache Foundation regarding the Log4j package specifically, view the CVE details here: https://logging.apache.org/log4j/2.x/security.html

Vulnerability Description

This vulnerability, known colloquially as “Log4Shell” since it provides unhindered access to execute code on the compromised machine, affects one of the most popular logging libraries in the Java ecosystem (“over three billion devices run java”).

A logger is supposed to just record details of an even to a file, database, or send it to another server to store it. But in the case of log4j, there are a few things that are performed before writing anything. One of the things it does is look for patterns like ${something} and will try to replace it with additional information, i.e. ${date} could be replaced by the date of the error.

The problematic issue is that there are messages logged including strings like:

${jndi:...

Logback tries to replace the data, invoking another mechanism that loads a resource from another computer… anywhere on the internet.

This data can be a malicious code.

Due to the nature of Java the malicious code is automatically run on the computer that used log4j, which means that at the attacker can make the targeted computer do (almost) anything. All that it takes for that code to execute is for the attacker to get the string to be logged.

If your java web server, for example, is logging what urls are accessed it could be as simple as including the malicious code in an HTTP request to the server.

Generic Mitigation Strategies

Adding log4j2.formatMsgNoLookups=true as a JVM property to any vulnerable application’s Java Virtual Machine will remediate the issue.

External mitigation is also available via a Web Application Firewall (WAF). We recommend reaching out to your WAF vendor regarding mitigation for this vulnerability, and blocking some of the known prefixes such as:

Auth0

Auth0 cloud identity services are not vulnerable. See: https://twitter.com/auth0/status/1470086301902721024


Apereo CAS

CAS versions 6.3+ is vulnerable and requires immediate mitigation. Deployers can immediately mitigate by updating to the latest versions (at the time of writing) of each branch of CAS:

6.3.x

Modify your CAS overlay to point to the version 6.3.7.2.

6.4.x

Modify your CAS overlay to point to the version 6.4.4.

Alternative Mitigation

For users that can’t upgrade, another option is to set the log4j2.formatMsgNoLookups system property to true, e.g.

java -Dlog4j2.formatMsgNoLookups=true -jar cas.war

See: https://apereo.github.io/2021/12/11/log4j-vuln/ for additional details.


F5 BigIP

F5 BigIP products themselves are not vulnerable.

F5 provides guidance for deployers of F5 load balancers to block incoming traffic asserting the problematic JNDI strings here: https://support.f5.com/csp/article/K19026212


ForgeRock

The only ForgeRock product that utilizes Log4j is Autonomous Identity. ForgeRock Autonomous Identity is vulnerable, however all other ForgeRock products are not vulnerable.

As of December 13, 2021 a patch is unavailable, and as such ForgeRock recommends using the following setting:

log4j2.formatMsgNoLookups=true

or the Java Virtual Machine running Autonomous Identity.

For further details see: https://backstage.forgerock.com/knowledge/kb/book/b21824339#a39102625


Keycloak

Keycloak is not vulnerable unless you are using JMSAppender (non-standard; if you are using JMSAppender Keycloak recommends disabling that for now).

See: keycloak/keycloak#9078


Okta

Two on-premises Okta products (RADIUS Server Agent and On-Prem MFA Agent) are vulnerable. The mitigation for these products is to update to the latest version available from the Okta admin console.

Okta cloud-based identity solutions are not vulnerable.

See: https://sec.okta.com/articles/2021/12/log4shell


PingIdentity

PingFederate, PingAccess, PingCentral and PingIntelligence are vulnerable.

Maintenance releases that permanently resolve this issue will be made available soon, however in the meantime Ping recommends to mitigate in various ways depending upon your version and product. See: https://support.pingidentity.com/s/article/Log4j2-vulnerability-CVE-CVE-2021-44228 (Note: requires account, free from here.)


Shibboleth

Identity Provider

Shibboleth Identity Provider is not vulnerable using the default configuration. Shibboleth leverages SLF4j and Logback, not Log4j. Shibboleth IDP does ship with a Log4j bridge, however, leveraging this feature would require specifically enabling the functionality.

See: http://shibboleth.net/pipermail/announce/2021-December/000253.html for information provided by Shibboleth lead developer Scott Cantor.

You can read SLF4j’s discussion of the Log4j issue here: http://slf4j.org/log4shell.html

In effect, you may be vulnerable if your specific configuration loads Log4j, so you should validate what libraries you are using for logging. Adding the startup string -Dlog4j2.formatMsgNoLookups=true to the JVM will provide protection if you are uncertain of what logging facility your server is using.

Service Provider

Shibboleth Service Provider is not vulnerable as it is not a Java-based product.


WSO2

The following WSO2 products are vulnerable:

  • WSO2 Identity Server 5.9.0 and above
  • WSO2 Identity Server Analytics 5.7.0 and above
  • WSO2 Identity Server as Key Manager 5.9.0 and above
  • WSO2 API Manager 3.0.0 and above
  • WSO2 API Manager Analytics 2.6.0 and above
  • WSO2 Enterprise Integrator 6.1.0 and above
  • WSO2 Enterprise Integrator Analytics 6.6.0 and above
  • WSO2 Micro Integrator 1.1.0 and above
  • WSO2 Micro Integrator Dashboard 4.0.0 and above
  • WSO2 Micro Integrator Monitoring Dashboard 1.1.0 and above
  • WSO2 Stream Processor 4.0.0 and above
  • WSO2 Stream Integrator 1.0.0 and above
  • WSO2 Stream Integrator Tooling 1.0.0 and above
  • WSO2 Open Banking AM 2.0.0 and above
  • WSO2 Open Banking KM 2.0.0 and above

WSO2 provides a shell script that can be executed from the application’s base directory to locate the remove/update vulnerable classes: wso2/security-tools#169

See: https://docs.wso2.com/pages/viewpage.action?pageId=180948677 for additional details.


Need help assessing a security issue? Contact us to discuss your needs. IDM Engineering is a team of dedicated, honest SSO support engineers that are standing by to help!

The Future of Shibboleth SP

The Future of Shibboleth SP

The Future of Shibboleth SP


Two days ago the Shibboleth Consortium quietly released the latest version of Shibboleth Service Provider for all platforms.

The Shibboleth Project has released a small update to the SP software, V3.3.0, and it is now available from the download site and packages for supported platforms on the mirrors.

This release, while acknowledged by the Consortium as a “small update” containing mostly small fixes and library updates, as well as a “sweep of the code to add deprecation warnings to more at risk features.”

was notable primarily for the fact that there’s a remarkable amount of commentary regarding the future of Shibboleth SP.

This includes commentary on the build process changing to move away from the OpenSUSE Build Service to a local, Docker-based process, which (according to the Consortium):

is a much faster process for us but it expands and constrains what we can support at the same time. As a result, a number of older platforms for which we have been unofficially producing packages but not supporting for some years will not see further package updates starting with this release.

The older platforms that appear to no longer be officially supported include macOS and SuSE. Meanwhile new support has been added for Amazon Linux and Rocky Linux. They go on to state that CentOS will no longer be officially supported later this year. This is due to the fact that CentOS is fundamentally changing it’s nature:

Some of this is also in response to the CentOS changes coming next year, and due to CentOS 8 no longer representing a fixed OS target, we will be dropping official support for it as of the end of this year, though it’s possible packages may still be produced for it in the future as part of our process.

Importantly, there’s also this comment regarding the future of Shibboleth SP:

Lastly, we want to note that this is probably the final minor version of the software in its current form and new features are unlikely. Attention will be shifting in 2022 and 2023 to redesigning the SP into a much smaller native footprint alongside a Java-based appliance that performs the work of shibd today. This will represent a large and likely breaking change to much of the way the SP is configured and works, so if you find that non-appealing for your needs, this is a good time to be evaluating alternatives.

A Java-based SAML SP

While it appears that there is no concrete plan at this time for the exact nature of a future “Service Provider ver. 4”, according to the design notes any such software is likely to be Java-based, so that all or most of the components that dictate the SAML- and XML-handling can be done with existing code leveraged by the Shibboleth Identity Provider.

This likely means a standalone Java appliance application that can be deployed alongside Apache, IIS, etc. in order to host the “SAML core” while minimizing the C code that’s necessary for the consortium to maintain.

According to the draft Design Notes:

there are some key requirements we probably have some consensus on that a new design would have to maintain:
1. Support for Apache 2.4 and ISS 7+, ideally in a form that leads more easily to other options in the future.
2. Support for the current very general integration strategy for applications that relies on server variables or headers.
3. Some relatively straightforward options for clustering.

which means that the new SP is likely to be largely functional for most deployers in the future as it is today.

This represents such a massive shift that those designing and building new SAML deployments may wish to avoid new deployments of Shibboleth due to the uncertain future.

Choosing a SAML Stack

That said, there’s effectively a large amount of calculus to perform when choosing the proper SAML stack, and the long-term future of a given platform is an element that’s always entered into that problem. The recent changes that’ll be occurring in the Shibboleth sphere should not be taken as the sole factor in determining whether to use or not use a given SAML stack.

Shibboleth continues to be a stable platform, in both the SP and IdP components, and we expect the new SP (when it is ultimately released) will be a good, solid choice for a service provider. It is just worth consideration of the fact that it’s likely to change in the (relatively) near future, perhaps in a major way.

As always, IDM Engineering stands ready to guide our clients toward the most stable, most cost-effective, and most easily-supported SAML solution for any given SAML stack. If you’re looking to deploy Shibboleth or another SAML implementation, and don’t want the headache of researching the nuances of choosing which stack or library to use, reach out to us today.

Assessing Attribute Release Policies with AACLI

Assessing Attribute Release Policies with AACLI


Shibboleth Identity Provider (IdP) includes an incredibly useful and powerful tool for determining, without doing an actual authentication sequence, what attributes will be released for a given user (principal) and service provider.

That tool is the Attribute Authority Command Line Interface (AACLI).

You can invoke the AACLI tool by executing a script in the terminal, i.e. {idp.home}/bin/aacli.sh (or {idp.home}/bin/aacli.bat for Windows installations):

[user @ /opt/shibboleth-idp/]$ .bin/aacli.sh -n user -r https://sp.idmengineering.com/shibbolet

If you have correctly configured Access Controls for Administrative Functions, you may access the output of the script via a special resolvertest endpoint as such:

https://localhost.idmengineering.com/idp/profile/admin/resolvertest?principal=jdoe&requester=https%3A%2F%2Fsp.example.org%2Fsp

This URL you could access via curl for use in custom scripting.

Parameters


Query Parameter Shell Flag Description
principal –principal, -n Names the user for which to simulate an attribute resolution.
requester –requester, -r Identifies the service provider for which to simulate an attribute resolution.
acsIndex –acsIndex, -i Identifies the index of an <AttributeConsumingService> element in the SP’s metadata.
saml2 –saml2 Value is ignored, if present causes the output to be encoded into a SAML 2.0
assertion.
saml1 –saml1 Value is ignored, if present causes the output to be encoded into a SAML 1.1
assertion.

Examples


Shell Script, Simple Output

[idp.idmengineering.com shibboleth-idp]# ./bin/aacli.sh -n john -r https://sp.idmengineering.com/shibboleth

Result:

{
"requester": "https://sp.idmengineering.com/shibboleth",
"principal": "john",
"attributes": [


  {
    "name": "uid",
    "values": [
              "John"          ]
  },

  {
    "name": "mail",
    "values": [
              "support@idmengineering.com"          ]
  },

  {
    "name": "sn",
    "values": [
              "Doe"          ]
  }

]
}

Shell Script, Output formatted as SAML 2.0 Assertion

[idp.idmengineering.com shibboleth-idp]# ./bin/aacli.sh -n john -r https://sp.idmengineering.com/shibboleth

Result:

<?xml version="1.0" encoding="UTF-8"?>
<saml2:Assertion ID="_057aa390d3cebb0d9c7b90524667edd1"
    IssueInstant="2020-09-18T16:20:55.242Z" Version="2.0" xmlns:saml2="urn:oasis:names:tc:SAML:2.0:assertion">
    <saml2:Issuer>https://localhost.idmengineering.com/idp/shibboleth</saml2:Issuer>
    <saml2:Subject>
        <saml2:NameID
            Format="urn:oasis:names:tc:SAML:2.0:nameid-format:transient"
            NameQualifier="https://localhost.idmengineering.com/idp/shibboleth" SPNameQualifier="https://sp.idmengineering.com/shibboleth">AAdzZWNyZXQx49glc8r4c80yYO2LWKJ9yHk4GV3IzMIZvBYsEKNnbmxuRfySoLSAZBu7H3OTxNzJKTPIpTJ0o2Ye9YnyMIve0at0+QWNSGz/Rjuu1PW/wvse24m40MFlYWQoWu2EDO5cmYWYUWze/jBPtuyCN0XqM6MJczyAujM=</saml2:NameID>
    </saml2:Subject>
    <saml2:AttributeStatement>
        <saml2:Attribute FriendlyName="uid"
            Name="urn:oid:0.9.2342.19200300.100.1.1" NameFormat="urn:oasis:names:tc:SAML:2.0:attrname-format:uri">
            <saml2:AttributeValue>John</saml2:AttributeValue>
        </saml2:Attribute>
        <saml2:Attribute FriendlyName="mail"
            Name="urn:oid:0.9.2342.19200300.100.1.3" NameFormat="urn:oasis:names:tc:SAML:2.0:attrname-format:uri">
            <saml2:AttributeValue>support@idmengineering.com</saml2:AttributeValue>
        </saml2:Attribute>
        <saml2:Attribute FriendlyName="sn" Name="urn:oid:2.5.4.4" NameFormat="urn:oasis:names:tc:SAML:2.0:attrname-format:uri">
            <saml2:AttributeValue>Doe</saml2:AttributeValue>
        </saml2:Attribute>
    </saml2:AttributeStatement>
</saml2:Assertion>

URL Request, Simple Output

URL: https://localhost.idmengineering.com/idp/profile/admin/resolvertest?principal=john&requester=https%3A%2F%2Fsp.idmengineering.com%2Fshibboleth

URL Request, Output formatted as SAML 2.0 Assertion

URL: https://localhost.idmengineering.com/idp/profile/admin/resolvertest?saml2&principal=john&requester=https%3A%2F%2Fsp.idmengineering.com%2Fshibboleth


Attribute Resolution Trouble?

You can use AACLI to debug issues related to attribute release… but why is a given attribute not being released? Here are some common issues:

  • The attribute isn’t being provided by a data connector. This is perhaps because the attribute is null for that principal.
  • There is no attribute definition defined for that attribute.
  • The attribute definition does not define a dependency from which to pull the source attribute (i.e. explicitly specify the attribute or say which resolver it’s from).
  • The attribute definition is marked as a dependency only attribute and thus is not released from the resolver.
  • The attribute definition does not define an encoder appropriate for the given request protocol (i.e. SAML1 encoder exists but SAML2 doesn’t).
  • The attribute is being filtered out by the attribute filter policy.

The last point, the lack of an appropriate policy releasing the attribute for a given SP in attribute-filter.xml is the most likely cause of a missing attribute, and as such should most likely be checked first.


Need help debugging an attribute issue? Contact us to discuss your needs. IDM Engineering is a team of dedicated, honest SSO support engineers that are standing by to help!

Enabling ‘Debug’ Logging in ADFS

Enabling 'Debug' Logging in ADFS

Enabling ‘Debug’ Logging in ADFS


Microsoft Active Directory Federation Services (ADFS) isn’t the simplest SAML implementation to debug. When a new service provider (“relying party”) integration isn’t working, when configuring a new identity provider (“claims provider”), or just having issues with a particular user accessing a service, there is often little-to-no useful information within the default logs. That said, it’s relatively simple to lower the logging level:

Set Trace level and Enable the ADFS Tracing Log


  1. Run command prompt as an administrator.
  2. Type the following command:
    • wevtutil set-log “AD FS Tracing/Debug” /L:5
  3. Open Event Viewer.
  4. Right-click on Application and Services Logs.
  5. Select View -> “Show Analytics and Debug Logs”
  6. Navigate to Applications and Services Logs -> AD FS Tracing –> Debug.
  7. Right-click and select “Enable Log” to start trace debugging immediately.

To stop tracing, similarly:

  1. Follow Steps 1-6 above.
  2. Right-click and select “Disable Log” to stop trace debugging. It is difficult to scroll and search in the events page by page in the debug log, so it is recommended that you save all debug events to a *.evtx file first.
  3. Open the saved log again and observe that it now includes ADFS Tracing events.

Note: Trace/Debug logs in ADFS are very chatty… and should be used with discretion, and only for the duration of troubleshooting activity, on production servers.

Enable Object Access Auditing to See Access Data


To observe detailed information about access activities on the ADFS servers you must enable object access auditing in two locations on the ADFS servers:

To Enable Auditing:

  1. On the primary ADFS server, right-click on Service.
  2. Select the Success audits and Failure audits check boxes. These settings are valid for all ADFS servers in the farm.

To modify the Local Security Policy, do the following:

  1. Right-click the Start Menu, and select ‘Run’
  2. Type gpedit.msc and select ‘OK’
  3. Navigate to Computer Configuration -> Windows Settings -> Security Settings -> Local Policies -> Audit Policy
  4. In the policy list, right-click on Audit Object Access, and select ‘Properties’
  5. Select the Success and Failure check boxes. These settings have to be enabled in the Local Security Policy on each ADFS server (or in an equivalent GPO that is set in Active Directory).
  6. Click OK

Open the security event logs on the ADFS servers and search for the timestamps that correspond to any testing or troubleshooting that is being conducted.


Need help debugging an ADFS issue? Contact us to discuss your needs. IDM Engineering is a team of dedicated, honest SSO support engineers that are standing by to help!

SameSite Cookies and Shibboleth

SameSite Cookies and Shibboleth


Google Chrome v.80 is slated to be deployed to the stable channel on February 4th, 2020. (Note: some sources indicate Feb. 17th as the release target.) With this update comes a fundamental shift in the default handling of cookies within Chrome. Starting with this release, cookies will by default be treated as though they have the property SameSite=lax, instead of this property being unset.

The SameSite cookie attribute is a IETF draft written by Google Inc. which instructs the user-agent not to send the SameSite cookie during a cross-site HTTP request. The aim of the SameSite property is to help prevent certain forms of cross site request forgery. Cross-site HTTP requests are those for which the top level site (i.e. that shown in an address bar) changes during navigation.

The SameSite attribute can take three values:

  • strict – only attach cookies for ‘same-site’ requests.
  • lax – send cookies for ‘same-site’ requests, along with ‘cross-site’ top level navigations using safe HTTP methods e.g. (GET HEAD OPTIONS TRACE).
  • none – send cookies for all ‘same-site’ and ‘cross-site’ requests.

The previous behavior of the Chrome browser would be equivalent to SameSite=None.


Ramification for Shibboleth Identity Provider

Per the Shibboleth Consortium, which conducted extensive testing of the Identity Provider software:

the IdP should continue to function when its cookies are being defaulted to SameSite=Lax by browsers (currently tested on Chrome 78-81 and Firefox 72 with the same-site default flags set). Typically, we have only seen the IdP itself break when the JSESSIONID is set to SameSite=strict, which should not happen apart from when explicitly trying to set SameSite=none with older versions of Safari on MacOS <=10.14 and all WebKit browsers on iOS <=12 (Source)

They go on to list the following scenarios wherein SSO breaks, namely:

  • When using client side session storage, with htmlLocalStorage set to false, HTTP-POST SSO will not work (show login page again) with defaulted SameSite=Lax IdP cookies. However, when using client side session storage, with htmlLocalStorage set to true, and all bean references in shibboleth.ClientStorageServices are left as they are, HTTP-POST SSO will work with defaulted SameSite=Lax.
  • When using server side session storage, if either htmlLocalStorage or the bean references in shibboleth.ClientStorageServices are commented out, HTTP-POST SSO will not work (show login page again) with defaulted SameSite=Lax. Once again, however, when using sever side session storage, with htmlLocalStorage set to true, or all bean references in shibboleth.ClientStorageServices are left as they are, HTTP-POST SSO will work with defaulted SameSite=Lax.

Therefore, to take the relevant IdP-side steps necessary to guarantee SSO on existing installations of the IdP v3, you should enable the HTML Local Storage plugin whether you use client-side storage or server-side storage. This is achieved by setting the idp.storage.htmlLocalStorage property to true in idp.properties.

See the Shibboleth Wiki section re: StorageConfiguration for more information and the implications of this setting.

For more details on the Consortium’s investigatory work related to SameSite please visit this wiki page.


Ramification for Shibboleth Service Provider

Unfortunately, as noted by the Shibboleth Consortium, the bulk of the issues likely to arise within service provider deployments lie solely within the application space, and are likely outside of the Shibboleth domain.

Nor can we provide any sort of yes/no or good/bad conclusion for anybody as to whether “their system is affected”. That is going to depend entirely on the individual case and the only real answer is to test. (Source)

Effectively, SPs should really just test their systems prior to the expected launch of the SameSite changes in Chrome. You can test in either Firefox or Chrome:

Firefox

  • Enter about:config in the URL bar, Accept Risk and Continue
  • Type samesite to filter options to display: network.cookie.sameSite.laxByDefault
  • Set network.cookie.sameSite.laxByDefault to true

Chrome

  • Enter chrome://flags in URL bar
  • Type SameSite
  • Enable “SameSite by default cookies”

If your application fails to work under the test conditions, you can adjust the relevant (blocked) cookies in order to specify the SameSite=none directive. None of the cookies set by Shibboleth SP should require this directive, however, it is quite likely that you will need to adjust cookies within your application.

In particular, the notes from the Shibboleth Consortium further state that

… a typical source of problems for most applications is going to be load balancer behavior. If you’re using cookies for node affinity, you’re going to have problems with SameSite unless you do something about it.

and in particular, you should adjust your load balancer to specify SameSite=none for these affinity cookies.


Need help understanding how the SameSite cookie attribute affects your application or SSO environment? Contact us to discuss your needs. IDM Engineering is a team of dedicated, honest SSO support engineers that are standing by to help!

Configuring the CAS Management Webapp

Configuring the CAS Management Webapp

Configuring the CAS Management Webapp


This guide documents how to spin-up the CAS Management Webapp as an Apache Maven overlay. (You can do it with Gradle as well, but I prefer Maven.)

1. Pull down the repo.

mkdir /opt/cas/
git clone https://github.com/apereo/cas-management-overlay.git

You can browser the repository here: apareo/cas.

2. Edit etc/cas/config/management.properties:

— Add server names for CAS Management Webapp to authenticate, and details of the Management app itself:

cas.server.name: https://cas.example.edu
cas.server.prefix: https://cas.example.edu/cas
mgmt.serverName=https://idmutil04.kumc.edu
server.context-path=/cas-management
server.port=9443

— Add service registry. NOTE: Must be exactly what the CAS server uses, i.e. if you use the following configuration for an LDAP service registry in cas.properties on the CAS server, make sure to include this same config blob here. The following example demonstrates the LDAP Service Registry

# LDAP Service Registry
cas.serviceRegistry.ldap.ldapUrl=[REDACTED]
cas.serviceRegistry.ldap.baseDn=ou=CasTestServiceRegistry,ou=Services,o=IDVAULT
cas.serviceRegistry.ldap.bindDn=cn=casserviceregistry,ou=AuthAccounts,o=IDVAULT
cas.serviceRegistry.ldap.bindCredential=[REDACTED]
cas.serviceRegistry.ldap.serviceDefinitionAttribute=description
cas.serviceRegistry.ldap.idAttribute=uid
cas.serviceRegistry.ldap.objectClass=casRegisteredService
cas.serviceRegistry.ldap.searchFilter=(%s={0})
cas.serviceRegistry.ldap.loadFilter=(objectClass=%s)

3. Edit the pom.xml.

Include any additional dependencies you may have. For example, to include the LDAP Service Registry dependency:

<!-- LDAP Service Registry -->
<dependency>
  <groupId>org.apereo.cas</groupId>
  <artifactId>cas-server-support-ldap-service-registry</artifactId>
  <version>${cas.version}</version>
  <exclusions>
    <exclusion>
        <groupId>org.springframework</groupId>
        <artifactId>spring-web</artifactId>
    </exclusion>
  </exclusions>
</dependency>

Note that I needed to exclude the dependency’s dependency on spring-web so that it wasn’t included twice, otherwise you may get an error on startup such as this:

More than one fragment with the name [spring_web] was found. This is not legal with relative ordering. See section 8.2.2 2c of the Servlet specification for details. Consider using absolute ordering.

See: https://stackoverflow.com/questions/55177367/more-than-one-fragment-with-the-name-spring-web-was-found-in-non-maven-projec

4. Edit etc/cas/config/users.properties to add your users, i.e.

user=foo,ROLE_ADMIN

Note: The ‘foo’ is for a legacy password field, can be anything there. This is obviated if you use a JSON or YAML authorization list.

5. Build and deploy the WAR file to Tomcat:

./build.sh package
sudo install -C -m 775 -o tomcat -g root etc/cas/config/* /etc/cas/config
sudo install -C -m 775 -o tomcat -g root target/cas-management.war /opt/tomcat/webapps
sudo systemctl start tomcat

Resources:

https://apereo.github.io/cas-management/5.3.x/installation/Installing-ServicesMgmt-Webapp.html


Looking for support for CAS? Look no further! Contact us for all of you SSO support needs!